如何设计一个扛住千万级流量的系统?
今天跟大家聊一下很多小伙伴都比较关心的话题:如何设计一个扛住千万级流量的系统?
这个话题无论在面试,还是在实际工作中,都非常常见。
今天这篇文章就专门跟大家聊聊这个问题,希望对你会有所帮助。
01 三个关键点
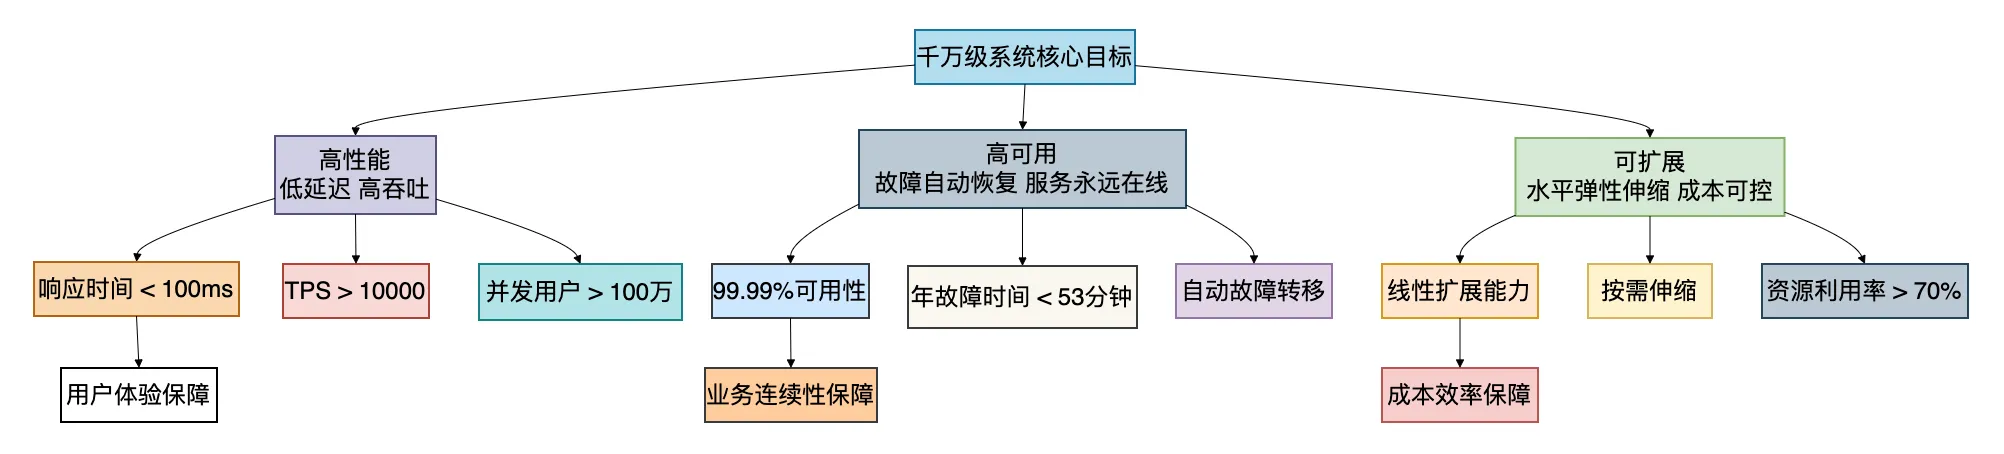
在深入技术细节前,我们先要明确设计千万级系统的核心目标。
记住这三个关键点:
- 高性能:不是简单追求快,而是要在保证正确性的前提下,用有限的资源处理尽可能多的请求。我们的目标是核心接口P99响应时间低于100毫秒,单机QPS不低于5000。
- 高可用:系统需要具备故障自愈能力。我们追求的是“两个9”打底,“三个9”起步,“四个9”努力的目标(即99.99%可用性,全年不可用时间不超过53分钟)。
- 可扩展:系统要能随着业务增长而平滑扩展,且扩展成本要可控。这里包括水平扩展(加机器)和垂直扩展(优化单机性能)两个维度。
02 架构演进:从单体到千万级的四步走
让我们从一个最简单的电商系统开始,看看它是如何一步步演进到支撑千万级流量的。
阶段一:单机单体架构(日请求<10万)
// 最简单的Spring Boot单体应用
@SpringBootApplication
@RestController
public class MonolithicApp {
@Autowired
private ProductService productService;

@Autowired
private OrderService orderService;

@GetMapping("/product/{id}")
public Product getProduct(@PathVariable Long id) {
    return productService.getById(id);
}

@PostMapping("/order")
public Order createOrder(@RequestBody OrderRequest request) {
    return orderService.createOrder(request);
}

public static void main(String[] args) {
    SpringApplication.run(MonolithicApp.class, args);
}
}
问题分析:
所有服务都在一个JVM进程中,一个bug可能导致整个系统崩溃
数据库成为单点瓶颈,无法水平扩展
发布时需要停机,影响用户体验
阶段二:垂直拆分(日请求10万-100万)
当系统压力增大时,我们首先进行垂直拆分:
// 商品服务 - 独立部署
@SpringBootApplication
@RestController
@RequestMapping("/product")
public class ProductServiceApp {
@GetMapping("/{id}")
public Product getProduct(@PathVariable Long id) {
    // 直接查询数据库
    return productRepository.findById(id).orElse(null);
}
}
// 订单服务 - 独立部署
@SpringBootApplication
@RestController
@RequestMapping("/order")
public class OrderServiceApp {
@PostMapping("/")
public Order createOrder(@RequestBody OrderRequest request) {
    // 通过HTTP调用商品服务
    Product product = restTemplate.getForObject(
        "http://product-service/product/" + request.getProductId(),
        Product.class
    );
    // 创建订单逻辑
    return orderRepository.save(order);
}
}
关键改进:
1.
数据库按业务拆分:商品库、订单库分离
2.
服务独立部署,故障隔离
3.
可以针对不同服务进行针对性优化
阶段三:水平扩展与服务治理(日请求100万-500万)
当单实例无法承载流量时,我们开始水平扩展:
Kubernetes部署配置文件示例
apiVersion: apps/v1
kind: Deployment
metadata:
name: product-service
spec:
replicas: 3 # 3个实例
selector:
matchLabels:
  app: product-service
template:
metadata:
  labels:
    app: product-service
spec:
  containers:
  - name: product-service
    image: product-service:latest
    resources:
      limits:
        memory: "512Mi"
        cpu: "500m"
    readinessProbe:  # 就绪探针
      httpGet:
        path: /actuator/health
        port: 8080
      initialDelaySeconds: 30
      periodSeconds: 10
    livenessProbe:   # 存活探针
      httpGet:
        path: /actuator/health
        port: 8080
      initialDelaySeconds: 60
      periodSeconds: 10
apiVersion: v1
kind: Service
metadata:
name: product-service
spec:
selector:
app: product-serviceports:
- port: 80
targetPort: 8080
type: ClusterIP
关键改进:
1.
服务多实例部署,负载均衡
2.
引入服务注册与发现(如Nacos、Consul)
3.
增加健康检查,实现故障自动转移
4.
配置中心统一管理配置
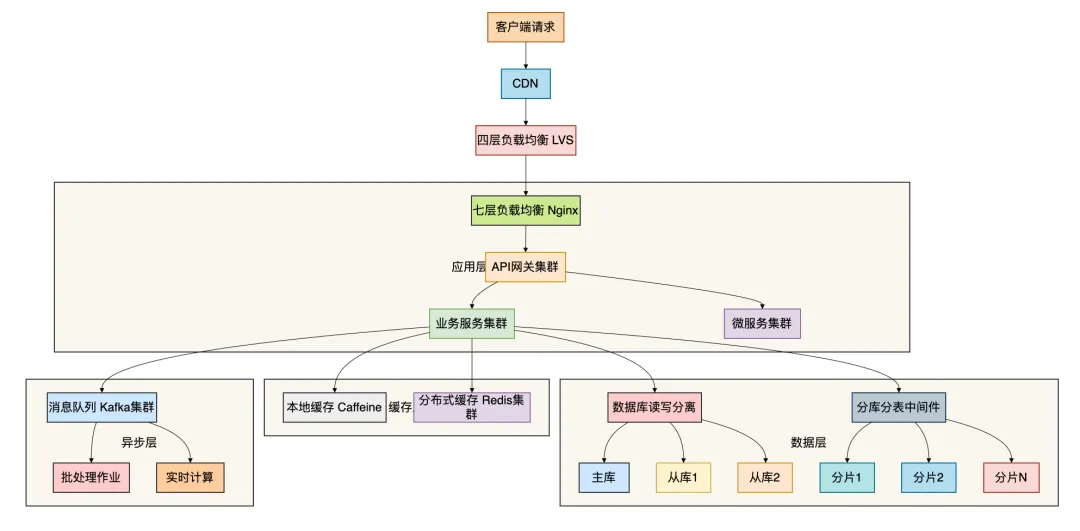
阶段四:全链路优化(日请求500万以上)
当系统规模继续扩大,我们需要更精细的优化:
这个架构图展示了一个完整的千万级系统架构。
接下来,我们深入每个关键组件。
03 负载均衡:流量分发的高可用之道
负载均衡是千万级系统的第一道防线。我们通常采用多层负载均衡策略:
四层负载均衡(LVS/ELB)
LVS DR模式配置示例
真实服务器配置回环接口
ifconfig lo:0 192.168.1.100 netmask 255.255.255.255 up
route add -host 192.168.1.100 dev lo:0
配置ARP抑制
echo "1" > /proc/sys/net/ipv4/conf/lo/arp_ignore
echo "2" > /proc/sys/net/ipv4/conf/lo/arp_announce
echo "1" > /proc/sys/net/ipv4/conf/all/arp_ignore
echo "2" > /proc/sys/net/ipv4/conf/all/arp_announce
LVS Director配置
ipvsadm -A -t 192.168.1.100:80 -s wrr
ipvsadm -a -t 192.168.1.100:80 -r 192.168.1.10:8080 -g -w 1
ipvsadm -a -t 192.168.1.100:80 -r 192.168.1.11:8080 -g -w 2
七层负载均衡(Nginx/API网关)
Nginx负载均衡配置
upstream backend_servers {
# 加权轮询,配合健康检查
server 192.168.1.10:8080 weight=3 max_fails=3 fail_timeout=30s;
server 192.168.1.11:8080 weight=2 max_fails=3 fail_timeout=30s;
server 192.168.1.12:8080 weight=1 max_fails=3 fail_timeout=30s;

# 会话保持(需要时开启)
# sticky cookie srv_id expires=1h domain=.example.com path=/;

# 备份服务器
server 192.168.1.13:8080 backup;
}
server {
listen 80;
server_name api.example.com;

# 限流配置
limit_req_zone $binary_remote_addr zone=api_limit:10m rate=100r/s;

location /api/ {
    # 应用限流
    limit_req zone=api_limit burst=50 nodelay;

    # 连接超时设置
    proxy_connect_timeout 3s;
    proxy_read_timeout 10s;
    proxy_send_timeout 10s;

    # 负载均衡
    proxy_pass http://backend_servers;

    # 故障转移
    proxy_next_upstream error timeout invalid_header http_500 http_502 http_503;
    proxy_next_upstream_timeout 0;
    proxy_next_upstream_tries 3;

    # 添加代理头
    proxy_set_header Host $host;
    proxy_set_header X-Real-IP $remote_addr;
    proxy_set_header X-Forwarded-For $proxy_add_x_forwarded_for;
}

# 健康检查端点
location /health {
    access_log off;
    return 200 "healthy\n";
}
}
现代API网关(Spring Cloud Gateway)
@Configuration
public class GatewayConfig {
@Bean
public RouteLocator customRouteLocator(RouteLocatorBuilder builder) {
    return builder.routes()
        .route("product_route", r -> r
            .path("/api/product/**")
            .filters(f -> f
                .requestRateLimiter(config -> config
                    .setRateLimiter(redisRateLimiter())
                    .setKeyResolver(ipKeyResolver()))
                .circuitBreaker(config -> config
                    .setName("productCircuitBreaker")
                    .setFallbackUri("forward:/fallback/product"))
                .rewritePath("/api/(?<segment>.*)", "/${segment}")
            )
            .uri("lb://product-service"))
        .route("order_route", r -> r
            .path("/api/order/**")
            .filters(f -> f
                .requestRateLimiter(config -> config
                    .setRateLimiter(redisRateLimiter())
                    .setKeyResolver(userKeyResolver()))
                .retry(config -> config
                    .setRetries(3)
                    .setStatuses(HttpStatus.INTERNAL_SERVER_ERROR))
            )
            .uri("lb://order-service"))
        .build();
}

@Bean
public RedisRateLimiter redisRateLimiter() {
    // 每秒10个请求,突发容量20
    return new RedisRateLimiter(10, 20, 1);
}

@Bean
public KeyResolver ipKeyResolver() {
    return exchange -> Mono.just(
        exchange.getRequest().getRemoteAddress().getAddress().getHostAddress()
    );
}
}
04 缓存策略:性能加速的智能分层
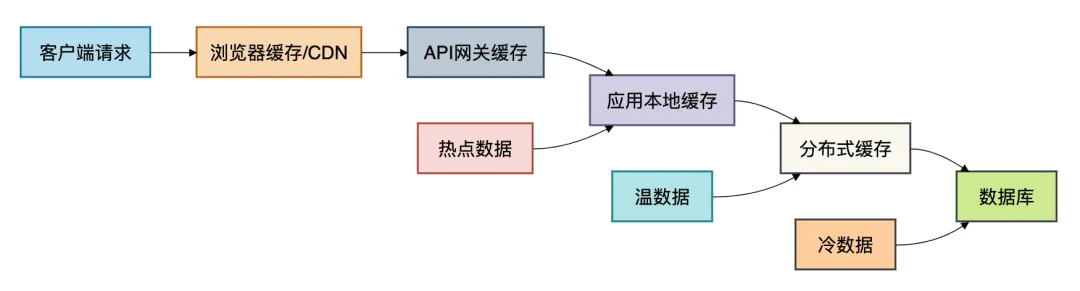
缓存是提升系统性能最有效的手段之一。千万级系统需要设计智能的多级缓存策略。
四级缓存架构
本地缓存(Caffeine)
@Component
public class LocalCacheManager {// 一级缓存:Guava Cache(适合较小数据量)
private final Cache<String, Object> guavaCache = CacheBuilder.newBuilder().maximumSize(10000) .expireAfterWrite(5, TimeUnit.MINUTES) .recordStats() .build();// 二级缓存:Caffeine(高性能,W-TinyLFU算法)
private final Cache<String, Object> caffeineCache = Caffeine.newBuilder().maximumSize(50000) .expireAfterWrite(10, TimeUnit.MINUTES) .refreshAfterWrite(1, TimeUnit.MINUTES) .recordStats() .build();// 热点数据特殊缓存(如秒杀商品)
private final Cache<String, Object> hotDataCache = Caffeine.newBuilder().maximumSize(1000) .expireAfterWrite(30, TimeUnit.SECONDS) // 热点数据过期快 .recordStats() .build();public
T getWithCache(String key, Class clazz, Supplier<T> loader, CacheLevel level) { switch (level) { case LOCAL_HOT: return getFromHotCache(key, clazz, loader); case LOCAL_NORMAL: return getFromLocalCache(key, clazz, loader); case DISTRIBUTED: return getFromDistributedCache(key, clazz, loader); default: return loader.get(); }}
private
T getFromLocalCache(String key, Class clazz, Supplier loader) { try { return (T) caffeineCache.get(key, k -> { T value = loader.get(); if (value == null) { // 缓存空值,防止缓存穿透 return new NullValue(); } return value; }); } catch (Exception e) { // 本地缓存异常,降级直接加载 return loader.get(); }}
}
// 使用示例
@Service
public class ProductService {
@Autowired
private LocalCacheManager cacheManager;

@Autowired
private RedisTemplate<String, Product> redisTemplate;

public Product getProductWithCache(Long productId) {
    String cacheKey = "product:" + productId;

    return cacheManager.getWithCache(cacheKey, Product.class, () -> {
        // 先查Redis分布式缓存
        Product product = redisTemplate.opsForValue().get(cacheKey);
        if (product != null) {
            return product;
        }

        // Redis没有,查数据库
        product = productRepository.findById(productId).orElse(null);
        if (product != null) {
            // 异步回写到Redis,不阻塞当前请求
            CompletableFuture.runAsync(() ->
                redisTemplate.opsForValue().set(cacheKey, product, 1, TimeUnit.HOURS)
            );
        }

        return product;
    }, CacheLevel.LOCAL_NORMAL);
}
}
分布式缓存(Redis集群)
@Configuration
public class RedisConfig {@Bean
public RedisConnectionFactory redisConnectionFactory() {RedisClusterConfiguration clusterConfig = new RedisClusterConfiguration(); // 集群节点配置 clusterConfig.addClusterNode(new RedisNode("192.168.1.100", 6379)); clusterConfig.addClusterNode(new RedisNode("192.168.1.101", 6379)); clusterConfig.addClusterNode(new RedisNode("192.168.1.102", 6379)); // 集群配置 clusterConfig.setMaxRedirects(3); // 最大重定向次数 return new JedisConnectionFactory(clusterConfig);}
@Bean
public RedisTemplate<String, Object> redisTemplate() {RedisTemplate<String, Object> template = new RedisTemplate<>(); template.setConnectionFactory(redisConnectionFactory()); // 使用String序列化器 template.setKeySerializer(new StringRedisSerializer()); template.setValueSerializer(new GenericJackson2JsonRedisSerializer()); // 开启事务支持 template.setEnableTransactionSupport(true); return template;}
@Bean
public RedisCacheManager cacheManager(RedisConnectionFactory connectionFactory) {RedisCacheConfiguration config = RedisCacheConfiguration.defaultCacheConfig() .entryTtl(Duration.ofMinutes(30)) // 默认过期时间 .disableCachingNullValues() // 不缓存null值 .serializeKeysWith(RedisSerializationContext.SerializationPair .fromSerializer(new StringRedisSerializer())) .serializeValuesWith(RedisSerializationContext.SerializationPair .fromSerializer(new GenericJackson2JsonRedisSerializer())); // 不同缓存区域的不同配置 Map<String, RedisCacheConfiguration> cacheConfigurations = new HashMap<>(); cacheConfigurations.put("product", config.entryTtl(Duration.ofHours(1))); cacheConfigurations.put("user", config.entryTtl(Duration.ofDays(1))); return RedisCacheManager.builder(connectionFactory) .cacheDefaults(config) .withInitialCacheConfigurations(cacheConfigurations) .transactionAware() .build();}
}缓存策略与问题解决
@Service
public class CacheStrategyService {/**
- 防止缓存穿透:缓存空值
*/
public Product getProductWithNullCache(Long productId) {
 String cacheKey = "product:" + productId;
 String nullCacheKey = "product_null:" + productId;

 // 先检查空值缓存
 if (Boolean.TRUE.equals(redisTemplate.hasKey(nullCacheKey))) {
     return null; // 知道是空值,直接返回,不查数据库
 }

 Product product = redisTemplate.opsForValue().get(cacheKey);
 if (product != null) {
     return product;
 }

 // 加分布式锁,防止缓存击穿
 String lockKey = "lock:product:" + productId;
 boolean locked = false;
 try {
     locked = tryLock(lockKey, 3, TimeUnit.SECONDS);
     if (locked) {
         // 双重检查
         product = redisTemplate.opsForValue().get(cacheKey);
         if (product != null) {
             return product;
         }

         // 查询数据库
         product = productRepository.findById(productId).orElse(null);

         if (product == null) {
             // 缓存空值,过期时间短
             redisTemplate.opsForValue().set(nullCacheKey, "NULL", 5, TimeUnit.MINUTES);
         } else {
             // 缓存数据
             redisTemplate.opsForValue().set(cacheKey, product, 1, TimeUnit.HOURS);
         }

         return product;
     } else {
         // 未获取到锁,短暂等待后重试或返回降级数据
         Thread.sleep(100);
         return getProductWithNullCache(productId);
     }
 } catch (InterruptedException e) {
     Thread.currentThread().interrupt();
     return null;
 } finally {
     if (locked) {
         releaseLock(lockKey);
     }
 }
}
/**
- 防止缓存雪崩:随机过期时间
*/
public void setWithRandomExpire(String key, Object value, long baseExpire, TimeUnit unit) {
 long expireTime = unit.toMillis(baseExpire);

 // 增加随机偏移量(±20%)
 double randomFactor = 0.8 + Math.random() * 0.4; // 0.8 ~ 1.2
 long actualExpire = (long) (expireTime * randomFactor);

 redisTemplate.opsForValue().set(
     key, value, actualExpire, TimeUnit.MILLISECONDS
 );
}
/**
- 热点数据发现与自动缓存
*/
@Scheduled(fixedDelay = 60000) // 每分钟执行一次
public void discoverHotData() {// 从Redis统计访问频率 Set<String> hotKeys = findHotKeys(); for (String key : hotKeys) { // 将热点数据加载到本地缓存 Object value = redisTemplate.opsForValue().get(key); if (value != null) { localCache.put(key, value); } }}
}- 防止缓存穿透:缓存空值
- 数据库设计:从单机到分布式
数据库是系统的核心,也是千万级系统最难扩展的部分。
读写分离
@Configuration
public class DataSourceConfig {
@Bean
@Primary
public DataSource dataSource() {
    // 主从数据源配置
    Map<Object, Object> targetDataSources = new HashMap<>();

    // 主库
    DataSource masterDataSource = createDataSource(
        "jdbc:mysql://master-db:3306/db?useSSL=false",
        "master_user",
        "master_password"
    );
    targetDataSources.put(DataSourceType.MASTER, masterDataSource);

    // 从库1
    DataSource slave1DataSource = createDataSource(
        "jdbc:mysql://slave1-db:3306/db?useSSL=false",
        "slave_user",
        "slave_password"
    );
    targetDataSources.put("slave1", slave1DataSource);

    // 从库2
    DataSource slave2DataSource = createDataSource(
        "jdbc:mysql://slave2-db:3306/db?useSSL=false",
        "slave_user",
        "slave_password"
    );
    targetDataSources.put("slave2", slave2DataSource);

    // 动态数据源
    DynamicDataSource dynamicDataSource = new DynamicDataSource();
    dynamicDataSource.setDefaultTargetDataSource(masterDataSource);
    dynamicDataSource.setTargetDataSources(targetDataSources);

    return dynamicDataSource;
}

@Bean
public AbstractRoutingDataSource routingDataSource() {
    return new AbstractRoutingDataSource() {
        @Override
        protected Object determineCurrentLookupKey() {
            return DynamicDataSourceContextHolder.getDataSourceType();
        }
    };
}

@Aspect
@Component
public class DataSourceAspect {

    @Before("@annotation(com.example.annotation.Master)")
    public void setMasterDataSource() {
        DynamicDataSourceContextHolder.setDataSourceType(DataSourceType.MASTER);
    }

    @Before("@annotation(com.example.annotation.Slave)")
    public void setSlaveDataSource() {
        // 随机选择从库
        String[] slaves = {"slave1", "slave2"};
        String selectedSlave = slaves[ThreadLocalRandom.current().nextInt(slaves.length)];
        DynamicDataSourceContextHolder.setDataSourceType(selectedSlave);
    }

    @After("@annotation(com.example.annotation.Master) || " +
           "@annotation(com.example.annotation.Slave)")
    public void clearDataSource() {
        DynamicDataSourceContextHolder.clearDataSourceType();
    }
}
}
// 使用示例
@Service
public class OrderService {
@Master // 使用主库
public void createOrder(Order order) {
    orderRepository.save(order); // 写操作
}

@Slave // 使用从库
public Order getOrder(Long orderId) {
    return orderRepository.findById(orderId).orElse(null); // 读操作
}
}
分库分表
// 分片策略:用户ID取模分片
@Component
public class UserShardingStrategy implements PreciseShardingAlgorithm
@Override
public String doSharding(Collection<String> availableTargetNames,
                         PreciseShardingValue<Long> shardingValue) {
    long userId = shardingValue.getValue();

    // 分片数
    int shardCount = availableTargetNames.size();

    // 简单取模分片
    long shardIndex = userId % shardCount;

    for (String tableName : availableTargetNames) {
        if (tableName.endsWith("_" + shardIndex)) {
            return tableName;
        }
    }

    throw new UnsupportedOperationException("无法找到对应的分片表");
}
}
// 分库分表配置
@Configuration
public class ShardingConfig {
@Bean
public DataSource shardingDataSource() throws SQLException {
    // 数据源映射
    Map<String, DataSource> dataSourceMap = new HashMap<>();
    dataSourceMap.put("ds0", createDataSource("jdbc:mysql://db0:3306/db"));
    dataSourceMap.put("ds1", createDataSource("jdbc:mysql://db1:3306/db"));
    dataSourceMap.put("ds2", createDataSource("jdbc:mysql://db2:3306/db"));

    // 用户表分片规则
    ShardingRuleConfiguration shardingRuleConfig = new ShardingRuleConfiguration();

    // 用户表分表规则
    TableRuleConfiguration userTableRuleConfig = new TableRuleConfiguration("user", "ds${0..2}.user_${0..7}");
    userTableRuleConfig.setDatabaseShardingStrategyConfig(
        new InlineShardingStrategyConfiguration("id", "ds${id % 3}")
    );
    userTableRuleConfig.setTableShardingStrategyConfig(
        new StandardShardingStrategyConfiguration("id", new UserShardingStrategy())
    );

    // 订单表分表规则
    TableRuleConfiguration orderTableRuleConfig = new TableRuleConfiguration("order", "ds${0..2}.order_${0..15}");
    orderTableRuleConfig.setDatabaseShardingStrategyConfig(
        new InlineShardingStrategyConfiguration("user_id", "ds${user_id % 3}")
    );
    orderTableRuleConfig.setTableShardingStrategyConfig(
        new InlineShardingStrategyConfiguration("order_id", "order_${order_id % 16}")
    );

    shardingRuleConfig.getTableRuleConfigs().add(userTableRuleConfig);
    shardingRuleConfig.getTableRuleConfigs().add(orderTableRuleConfig);

    // 创建ShardingSphere数据源
    return ShardingSphereDataSourceFactory.createDataSource(
        dataSourceMap, Collections.singleton(shardingRuleConfig), new Properties()
    );
}
}
数据库优化实战
-- 1. 索引优化示例
-- 错误的索引设计
CREATE INDEX idx_user_email ON user(email); -- 过长的索引
CREATE INDEX idx_user_status ON user(status); -- 低区分度的索引
-- 正确的索引设计
-- 联合索引,注意字段顺序
CREATE INDEX idx_user_created_status ON user(created_at, status);
-- 前缀索引,适合长字段
CREATE INDEX idx_user_email_prefix ON user(email(20));
-- 2. 慢查询优化示例
-- 优化前:全表扫描
EXPLAIN SELECT * FROM order WHERE YEAR(created_at) = 2024;
-- 优化后:使用索引
EXPLAIN SELECT * FROM order
WHERE created_at >= '2024-01-01'
AND created_at < '2025-01-01';
-- 3. 分页优化
-- 传统分页(数据量大时慢)
SELECT * FROM user ORDER BY id LIMIT 1000000, 20;
-- 优化分页(使用覆盖索引)
SELECT * FROM user
WHERE id > (SELECT id FROM user ORDER BY id LIMIT 1000000, 1)
ORDER BY id LIMIT 20;
-- 4. 批量操作优化
-- 批量插入
INSERT INTO user (name, email) VALUES
('user1', 'user1@example.com'),
('user2', 'user2@example.com'),
-- ... 1000条
('user1000', 'user1000@example.com');
-- 批量更新(避免在循环中单条更新)
UPDATE user SET status = 'active'
WHERE id IN (1, 2, 3, ..., 1000);
06 异步处理与消息队列
对于千万级系统,同步处理所有请求是不现实的。异步化是提高系统吞吐量的关键。
消息队列设计
@Configuration
public class KafkaConfig {
@Bean
public ProducerFactory<String, String> producerFactory() {
    Map<String, Object> configProps = new HashMap<>();
    configProps.put(
        ProducerConfig.BOOTSTRAP_SERVERS_CONFIG,
        "kafka1:9092,kafka2:9092,kafka3:9092"
    );
    configProps.put(
        ProducerConfig.KEY_SERIALIZER_CLASS_CONFIG,
        StringSerializer.class
    );
    configProps.put(
        ProducerConfig.VALUE_SERIALIZER_CLASS_CONFIG,
        StringSerializer.class
    );
    // 高吞吐量配置
    configProps.put(ProducerConfig.LINGER_MS_CONFIG, 20); // 批量发送延迟
    configProps.put(ProducerConfig.BATCH_SIZE_CONFIG, 32 * 1024); // 批量大小
    configProps.put(ProducerConfig.COMPRESSION_TYPE_CONFIG, "lz4"); // 压缩

    // 高可靠性配置
    configProps.put(ProducerConfig.ACKS_CONFIG, "all"); // 所有副本确认
    configProps.put(ProducerConfig.RETRIES_CONFIG, 3); // 重试次数
    configProps.put(ProducerConfig.ENABLE_IDEMPOTENCE_CONFIG, true); // 幂等性

    return new DefaultKafkaProducerFactory<>(configProps);
}

@Bean
public KafkaTemplate<String, String> kafkaTemplate() {
    return new KafkaTemplate<>(producerFactory());
}
}
@Service
public class OrderMessageService {
@Autowired
private KafkaTemplate<String, String> kafkaTemplate;

// 顺序消息发送
public void sendOrderEvent(OrderEvent event) {
    // 使用订单ID作为key,保证同一订单的消息顺序
    String key = String.valueOf(event.getOrderId());
    String topic = "order-events";

    kafkaTemplate.send(topic, key, JsonUtils.toJson(event))
        .addCallback(
            result -> log.info("消息发送成功: {}", event),
            ex -> {
                log.error("消息发送失败: {}", event, ex);
                // 失败处理:记录到数据库,定时重试
                saveFailedMessage(event, ex.getMessage());
            }
        );
}

// 批量消息处理
@KafkaListener(topics = "order-events",
               containerFactory = "batchFactory")
public void processOrderEvents(List<ConsumerRecord<String, String>> records) {
    List<OrderEvent> events = new ArrayList<>();

    for (ConsumerRecord<String, String> record : records) {
        try {
            OrderEvent event = JsonUtils.fromJson(record.value(), OrderEvent.class);
            events.add(event);
        } catch (Exception e) {
            log.error("消息解析失败: {}", record.value(), e);
        }
    }

    if (!events.isEmpty()) {
        // 批量处理
        batchProcessOrders(events);
    }
}

@Bean
public ConcurrentKafkaListenerContainerFactory<String, String> batchFactory() {
    ConcurrentKafkaListenerContainerFactory<String, String> factory =
        new ConcurrentKafkaListenerContainerFactory<>();
    factory.setConsumerFactory(consumerFactory());
    factory.setBatchListener(true); // 开启批量监听
    factory.getContainerProperties().setPollTimeout(3000);
    return factory;
}
}
异步处理模式
// 1. CompletableFuture异步处理
@Service
public class AsyncOrderService {
@Autowired
private ThreadPoolTaskExecutor taskExecutor;

public CompletableFuture<OrderResult> createOrderAsync(OrderRequest request) {
    return CompletableFuture.supplyAsync(() -> {
        // 第一步:校验
        validateOrder(request);

        return request;
    }, taskExecutor).thenComposeAsync(validatedRequest -> {
        // 第二步:扣减库存
        return reduceInventoryAsync(validatedRequest);
    }, taskExecutor).thenComposeAsync(inventoryResult -> {
        // 第三步:生成订单
        return generateOrderAsync(inventoryResult);
    }, taskExecutor).thenApplyAsync(order -> {
        // 第四步:发送通知
        sendNotification(order);
        return new OrderResult(order, "SUCCESS");
    }, taskExecutor).exceptionally(ex -> {
        // 异常处理
        log.error("订单创建失败", ex);
        return new OrderResult(null, "FAILED: " + ex.getMessage());
    });
}

// 2. 事件驱动架构
@Component
public class OrderEventPublisher {

    @Autowired
    private ApplicationEventPublisher eventPublisher;

    public void createOrder(Order order) {
        // 保存订单
        orderRepository.save(order);

        // 发布领域事件
        eventPublisher.publishEvent(new OrderCreatedEvent(this, order));
    }
}

@Component
public class OrderEventListener {

    @EventListener
    @Async
    public void handleOrderCreated(OrderCreatedEvent event) {
        Order order = event.getOrder();

        // 异步发送邮件
        emailService.sendOrderConfirmation(order);

        // 异步更新统计数据
        statisticsService.updateOrderStats(order);

        // 异步通知库存系统
        inventoryService.notifyOrderCreated(order);
    }
}
}
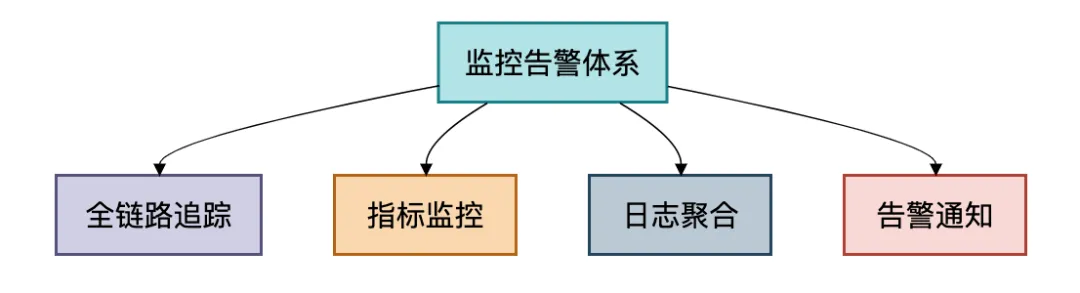
07 监控与治理:系统的眼睛和大脑
没有监控的系统就像盲人开车。千万级系统需要完善的监控体系。
全链路监控
// 1. 链路追踪(基于SkyWalking)
@Configuration
public class TracingConfig {
@Bean
public Tracer skywalkingTracer() {
    // SkyWalking自动注入,只需添加依赖
    return new SkywalkingTracer();
}
}
// 在业务代码中自动追踪
@Service
public class ProductService {
@Trace(operationName = "ProductService.getProduct") // SkyWalking注解
@Tag(key = "productId", value = "arg[0]") // 添加标签
public Product getProduct(Long productId) {
    // 业务逻辑
    return productRepository.findById(productId).orElse(null);
}
}
// 2. 指标监控(Micrometer + Prometheus)
@Configuration
public class MetricsConfig {
@Bean
public MeterRegistry meterRegistry() {
    return new PrometheusMeterRegistry(PrometheusConfig.DEFAULT);
}

@Bean
public TimedAspect timedAspect(MeterRegistry registry) {
    return new TimedAspect(registry);
}
}
@Service
public class OrderService {
private final Counter orderCounter;
private final Timer orderTimer;

public OrderService(MeterRegistry registry) {
    orderCounter = Counter.builder("orders.created")
        .description("创建的订单数量")
        .tag("type", "normal")
        .register(registry);

    orderTimer = Timer.builder("orders.process.time")
        .description("订单处理时间")
        .publishPercentiles(0.5, 0.95, 0.99) // 50%, 95%, 99%分位数
        .register(registry);
}

@Timed(value = "orders.create", extraTags = {"priority", "high"})
public Order createOrder(OrderRequest request) {
    return orderTimer.record(() -> {
        Order order = processOrder(request);
        orderCounter.increment();
        return order;
    });
}
}
// 3. 健康检查
@Component
public class CustomHealthIndicator implements HealthIndicator {
@Autowired
private DataSource dataSource;

@Autowired
private RedisConnectionFactory redisConnectionFactory;

@Override
public Health health() {
    // 检查数据库连接
    boolean dbHealthy = checkDatabase();

    // 检查Redis连接
    boolean redisHealthy = checkRedis();

    // 检查磁盘空间
    boolean diskHealthy = checkDiskSpace();

    if (dbHealthy && redisHealthy && diskHealthy) {
        return Health.up()
            .withDetail("database", "connected")
            .withDetail("redis", "connected")
            .withDetail("disk", "sufficient")
            .build();
    } else {
        Map<String, Object> details = new HashMap<>();
        details.put("database", dbHealthy ? "connected" : "disconnected");
        details.put("redis", redisHealthy ? "connected" : "disconnected");
        details.put("disk", diskHealthy ? "sufficient" : "insufficient");

        return Health.down().withDetails(details).build();
    }
}

private boolean checkDatabase() {
    try {
        return dataSource.getConnection().isValid(5);
    } catch (SQLException e) {
        return false;
    }
}
}
智能告警
Prometheus告警规则
groups:
name: application_alerts
rules:
# 错误率告警- alert: HighErrorRate
expr: rate(http_requests_total{status=~"5.."}[5m]) / rate(http_requests_total[5m]) > 0.01
for: 2m
labels:
severity: critical
annotations:
summary: "高错误率告警"
description: "错误率超过1% (当前值: $value }})"
# 延迟告警
- alerts)"
# 服务宕机告警
- alert: ServiceDown
expr: up == 0
for: 1m
labels:
severity: critical
annotations:
summary: "服务宕机告警"
description: "{{ $labels.job }} 服务已宕机"
- alert: HighErrorRate
08 实战案例:秒杀系统设计
让我们用一个具体的例子来综合运用上述技术。
@Service
public class SeckillService {
// 1. 缓存预热
@PostConstruct
public void warmUpCache() {
    List<SeckillProduct> hotProducts = findHotProducts();

    hotProducts.parallelStream().forEach(product -> {
        String stockKey = "seckill:stock:" + product.getId();
        redisTemplate.opsForValue().set(stockKey, product.getStock());

        // 设置随机过期时间,防止雪崩
        setWithRandomExpire(stockKey, product.getStock(), 10, TimeUnit.MINUTES);
    });
}

// 2. 秒杀入口(防刷+限流)
@RateLimiter(key = "'seckill:' + #userId",
             limit = 1, period = 10, unit = TimeUnit.SECONDS)
public SeckillResult seckill(Long userId, Long productId) {
    // 2.1 资格校验(Redis实现)
    String userKey = "seckill:user:" + productId + ":" + userId;
    if (Boolean.TRUE.equals(redisTemplate.hasKey(userKey))) {
        return SeckillResult.alreadyParticipated();
    }

    // 2.2 库存预扣减(Lua脚本保证原子性)
    String stockKey = "seckill:stock:" + productId;
    Long remaining = redisTemplate.execute(
        stockDecrScript,
        Collections.singletonList(stockKey),
        "1"
    );

    if (remaining < 0) {
        // 库存不足,回滚
        redisTemplate.opsForValue().increment(stockKey, 1);
        return SeckillResult.outOfStock();
    }

    // 2.3 记录用户购买资格
    redisTemplate.opsForValue().set(userKey, "1", 1, TimeUnit.HOURS);

    // 2.4 发送消息到队列,异步创建订单
    String orderKey = "seckill:order:" + UUID.randomUUID();
    SeckillOrderMessage message = new SeckillOrderMessage(userId, productId, orderKey);

    kafkaTemplate.send("seckill-orders",
        String.valueOf(productId),
        JsonUtils.toJson(message)
    );

    return SeckillResult.success(orderKey);
}

// 3. 异步订单处理
@KafkaListener(topics = "seckill-orders",
               groupId = "seckill-order-processor")
public void processSeckillOrder(String message) {
    SeckillOrderMessage orderMessage = JsonUtils.fromJson(message, SeckillOrderMessage.class);

    try {
        // 3.1 创建订单(数据库操作)
        Order order = createOrderInDB(orderMessage);

        // 3.2 更新缓存状态
        String resultKey = "seckill:result:" + orderMessage.getOrderKey();
        redisTemplate.opsForValue().set(resultKey, order.getId(), 10, TimeUnit.MINUTES);

        // 3.3 发送成功通知
        notifyUser(orderMessage.getUserId(), order);

    } catch (Exception e) {
        log.error("处理秒杀订单失败", e);

        // 失败处理:恢复库存
        String stockKey = "seckill:stock:" + orderMessage.getProductId();
        redisTemplate.opsForValue().increment(stockKey, 1);

        // 移除用户资格记录
        String userKey = "seckill:user:" + orderMessage.getProductId() + ":" + orderMessage.getUserId();
        redisTemplate.delete(userKey);
    }
}

// 4. 库存扣减Lua脚本
private final DefaultRedisScript<Long> stockDecrScript = new DefaultRedisScript<>(
    "local key = KEYS[1]\n" +
    "local decrement = tonumber(ARGV[1])\n" +
    "local current = redis.call('get', key)\n" +
    "if not current then\n" +
    "    return -1\n" +
    "end\n" +
    "local currentNum = tonumber(current)\n" +
    "if currentNum < decrement then\n" +
    "    return -1\n" +
    "end\n" +
    "return redis.call('decrby', key, decrement)",
    Long.class
);
}
总结
设计一个扛住千万级流量的系统,不是简单堆砌技术组件,而是构建一个有机的、能自我调节的生态系统。
通过本文的分享,我想你已经看到了一个完整的高并发系统架构图景。
让我最后总结一下关键点:
1.
架构是演进而来的:不要一开始就追求完美架构,而是随着业务增长不断演进。从小而美的单体开始,逐步拆分、优化、扩展。
2.
缓存是性能的银弹:但要用得聪明。多级缓存、智能淘汰、防止穿透/击穿/雪崩,每个细节都影响巨大。
3.
数据库是瓶颈所在:读写分离、分库分表、索引优化、SQL调优,这些基本功比任何炫酷的技术都重要。
4.
异步是扩展的关键:能异步的绝不同步,能批处理的绝不单条。消息队列、事件驱动、反应式编程,让系统松耦合、高内聚。
5.
监控是系统的眼睛:没有监控的系统就是在裸奔。全链路追踪、指标监控、日志聚合、智能告警,缺一不可。
6.
容错比优化更重要:系统一定会出问题,关键是如何快速发现、快速恢复、快速止损。熔断、降级、限流、重试,这些机制是系统的保险绳。